
Developing a 2D Sandbox Tile Manager
May 4, 2026(modified October 6, 2026)Introduction
One of the most important systems of a 2D sandbox game is the tile management. This system determines how the player interacts with the world around them, and how they make their world their own. Tile management is fairly simple to get running, but gets complex when considering performance. In our final build of Wizbowo's Conquest, our tile manager had the following capabilities:
- Asynchronous Tile Rendering
- Live Updating
- Liquid Rendering
- Lighting System
Tile Layout
Wizbowo's Conquest follows a similar world size structure to Terraria. This means that small worlds are 4200x1200 tiles, medium worlds are 6400x1800, and large worlds are 8400x2400. In order to store this data, we need an efficient structure that handles memory as efficiently as possible. Terraria uses a single struct approach to keep data packed tightly:
public class Tile {
    public ushort type;
    public ushort wall;
    public byte liquid;
    public short sTileHeader;
    public byte bTileHeader;
    public byte bTileHeader2;
    public byte bTileHeader3;
    public short frameX;
    public short frameY;
    ...
}
The exact layout of struct is out of the scope of the blog post, but the primary idea is that everything that the game needs to handle tiles (block id, wall id, slope variant, liquid type, etc.) is stored in 1 place. Godot doesn't have an equal equivalent to structs, so we have to take a different approach:
# These are interpreted as 16-bit integers
var blocks      := PackedByteArray()
var walls       := PackedByteArray()

# These are interpreted as 8-bit integers
var liquid      := PackedByteArray()
var liquid_type := PackedByteArray()
...
This approach keeps the tightly-packed format, but has each tile property in its own array instead of packed into a single tile struct. In terms of memory usage, these approaches are largely comparable (although we favored a full liquid_type array for simplicity).
Asynchronous Tile Rendering
We are using Godot's TileMapLayer node for tile collision and rendering to keep things simple. This does come with a large downside, however: we cannot finely control the rendering system. Because of this, we had to implement a few workarounds in order to keep performance up. One important optimization is that chunks are logically (but not physically) separated into 16x16 tile chunks.
Auto-Tiling Rules
Wizbowo's Conquest follows a minimal 47-tile connection system for auto-tiling. This means that blocks will adjust their sprites based on their neighbors. Below is the exact template we use:
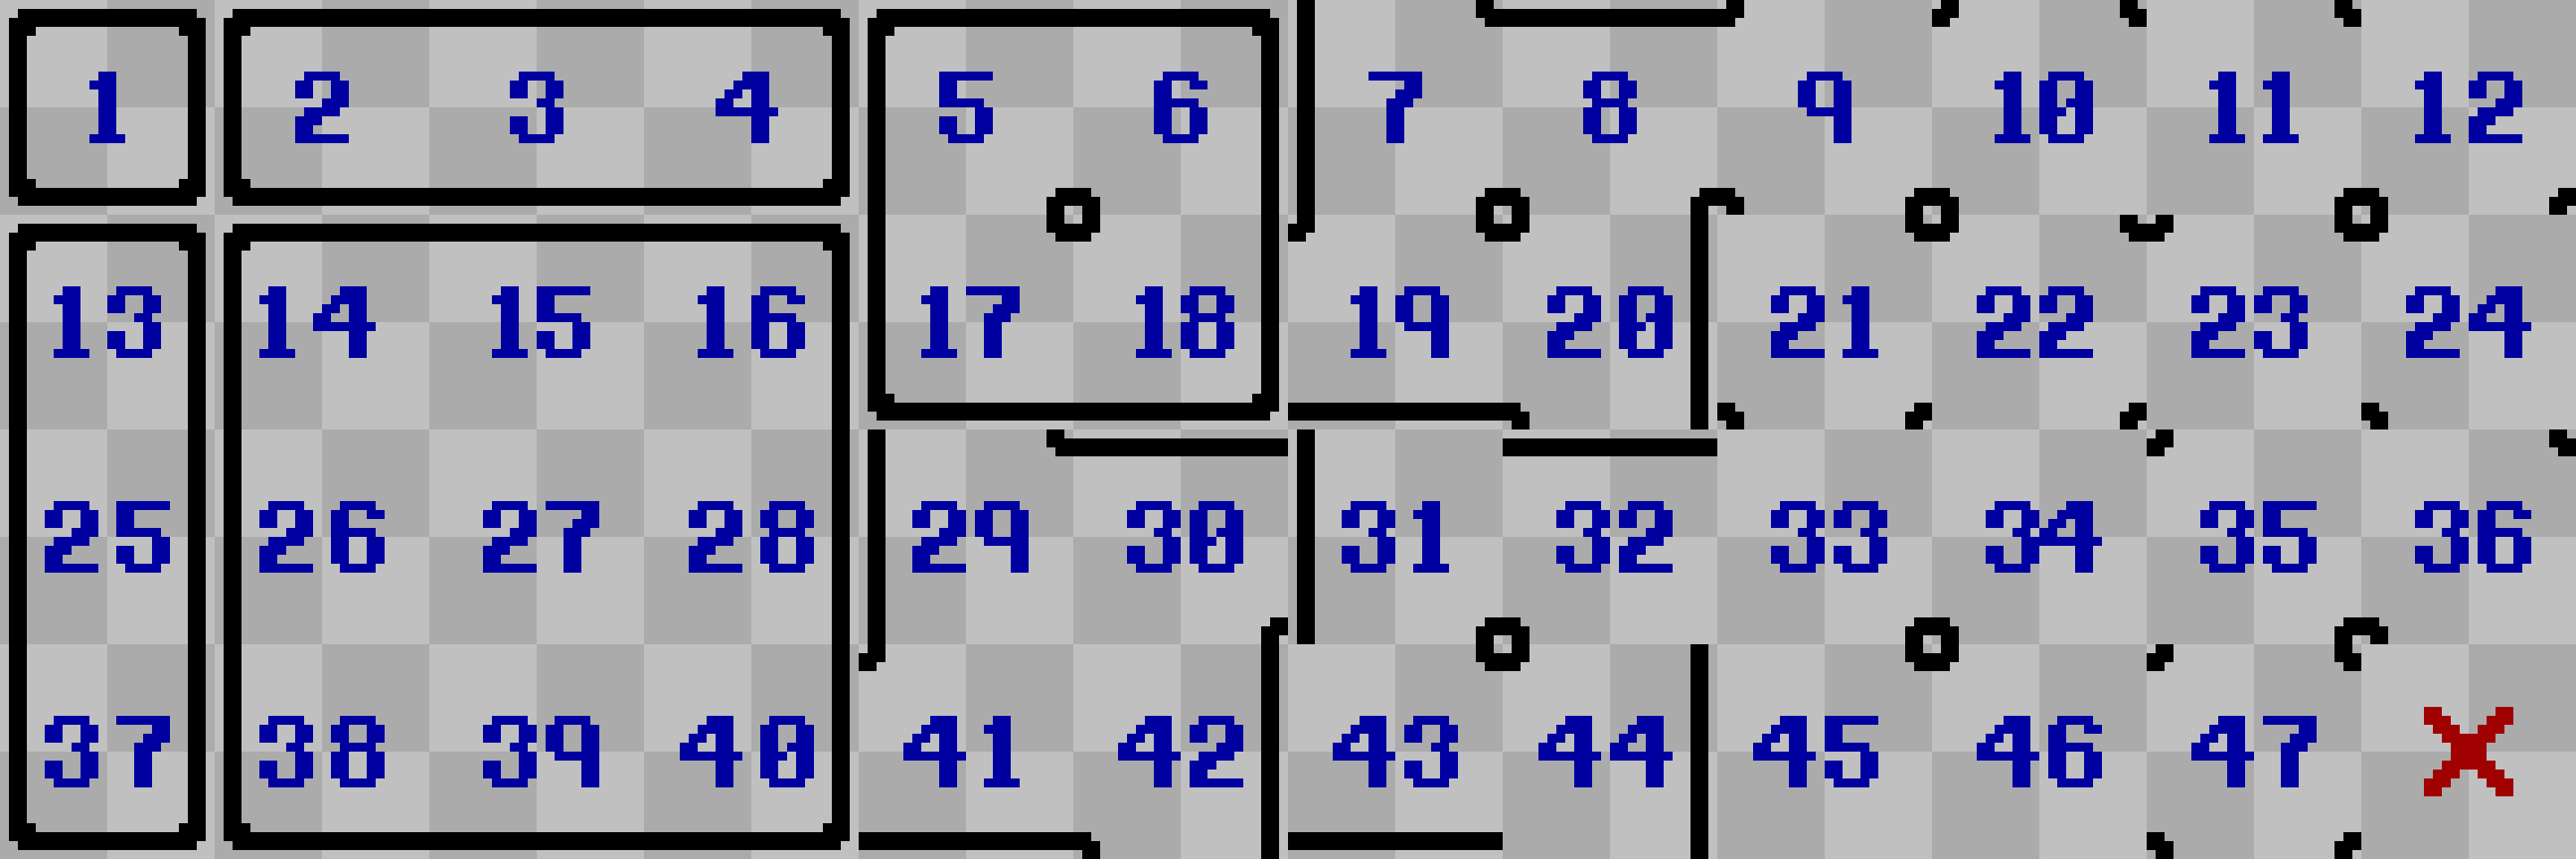
Determining what tile to select from this grid happens in two steps:
- Calculate whether or not cardinal neighbors exist (Up, Down, Left, Right)
- For each diagonal position, check to see if their two cardinal neighbors exist
Implementation
The second rule gives us a subset of the full 255-tile set that requires just 47 tiles. This is typically enough for most games (and requires a lot less work), so it's what we chose for Wizbowo's Conquest. In practice, the auto-tile calculation looks like this:
# store tiles in a bitmask format
value = 0b00000000

# cardinal neighbors
if is_solid[prev_blocks[x]]:
    value += 1
if is_solid[curr_blocks[x - 1]]:
    value += 2
if is_solid[curr_blocks[x + 1]]:
    value += 4
if is_solid[next_blocks[x]]:
    value += 8

# diagonal neighbors
if value & 1 and value & 2 and is_solid[prev_blocks[x - 1]]:
    value += 16
if value & 1 and value & 4 and is_solid[prev_blocks[x + 1]]:
    value += 32
if value & 8 and value & 2 and is_solid[next_blocks[x - 1]]:
    value += 64
if value & 8 and value & 4 and is_solid[next_blocks[x + 1]]:
value += 128Update Queue
Speaking of rendering time, in order to keep gameplay smooth, we limit the number of chunks we update in a single frame. Instead of having a hard count, we limit based on current update time. For Wizbowo's Conquest, we found 4 milliseconds to be an reasonable value:
# store the start time
var start := Time.get_ticks_usec()

for chunk in chunks:
    # only updated dirty chunks
    if chunk_states.get(chunk, UpdateState.UNLOADED) == UpdateState.DIRTY:
        # calculates auto-tiling and sets tiles
        autotile_region(
            chunk.x * TileManager.CHUNK_SIZE - 1,
            chunk.y * TileManager.CHUNK_SIZE - 1,
            TileManager.CHUNK_SIZE + 2,
            TileManager.CHUNK_SIZE + 2
        )

        # remove chunk from queue
        queued_chunks.erase(chunk)

        # only process for up to 4ms
        if Time.get_ticks_usec() - start >= 4000:
            break
Live Updating
Since Wizbowo's Conquest is a real-time multiplayer game, we need to synchronize tile updates whenever blocks are placed and destroyed. Instead of running the full, expensive auto-tiling system each frame, we can just update the 3x3 range around the block that was modified. More mature tile management systems might batch these updates, but for Wizbowo's Conquest, we just update tiles immediately after they change.
func update_tile(x: int, y: int) -> void:
    # get tile maps
    var blocks: TileMapLayer = $'blocks'
    var walls: TileMapLayer = $'walls'

    var block := TileManager.get_block_unsafe(x, y)
    var wall := TileManager.get_wall_unsafe(x, y)

    # set blocks
    if block == 0:
        blocks.erase_cell(Vector2i(x, y))
    else:
        blocks.set_cell(Vector2i(x, y), block, Vector2i(2, 2))

    # set walls
    if wall == 0:
        walls.erase_cell(Vector2i(x, y))
    else:
        walls.set_cell(Vector2i(x, y), wall, Vector2i(2, 2))

    # auto-tile neighbors
autotile_region(x - 1, y - 1, 3, 3)Liquid Rendering
Most of the tiles in Wizbowo's Conquest are rendering using Godot's TileMapLayer node. However, these can be cumbersome for large updates (hence why we had to limit the allowed processing time). Additionally, they are not thread-safe (in fact, no SceneTree changes are allowed on other threads). To get around this, we used a shader-based approach for the two liquid types we have: water and lava.
void vertex() {
	world_position = (MODEL_MATRIX * vec4(VERTEX, 0.0, 1.0)).xy;
}

void fragment() {
	vec2 tile_position = world_position / 8.0 - water_offset;
	vec2 local_position = vec2(mod(world_position.x, 8.0), mod(world_position.y, 8.0));

	vec2 tex_size = vec2(textureSize(water_texture, 0));

	// Get water level from red channel
	float water_level = texture(water_texture, tile_position / tex_size).r;
	float local_level = (8.0 - local_position.y) / 8.0;

	// Make sure at least 1 pixel of water is rendered (if water exists)
	water_level = step(0.001, water_level) * max(water_level, 0.125);

	// Set base color
	COLOR = water_color;

	// Only color up to water level
	COLOR.a *= step(local_level, water_level);
}There are a few important details about this shader setup:
- The shader is connected to the player scene, rendering in front of the player but behind the tiles.
- The UVs are translated from local space to world space.
- The texture itself is 176x112 and snaps to the top-leftmost visible chunk.
- This specific setup causes the player to never see seams in the water renderer.
Threaded Generation
Creating a texture pixel-by-pixel can be pretty expensive, so we decided to offload this task to another thread. We can do this with image generation since we don't need the main thread to actually create the images:
func _rebuild_liquid_texture_internal(origin: Vector2i) -> void:
	# allocate water and lava data
    water_data = PackedByteArray()
	water_data.resize(WATER_WIDTH * WATER_HEIGHT)
	lava_data = PackedByteArray()
	lava_data.resize(WATER_WIDTH * WATER_HEIGHT)

	var index := 0

	# rebuild texture
	for y in range(WATER_HEIGHT):
		var row := (origin.y + y) * world_width

		for x in range(WATER_WIDTH):
			if origin.y + y < world_height and origin.x + x < world_width:
				var type := liquid_type[row + origin.x + x]

                # generate both textures at once for efficiency
				if type == WaterUpdater.WATER_TYPE:
					water_data[index] = liquid[row + origin.x + x]
				elif type == WaterUpdater.LAVA_TYPE:
					lava_data[index] = liquid[row + origin.x + x]

			index += 1

    # once done, route back to the main thread to update shaders
	_update_liquid_texture_internal.call_deferred(origin)
Lighting System
Terraria's rendering system adds tile-based lighting during the main rendering step. For the same reasons as the liquid renderer (tile map overhead + lack of threading support), we did not use a TileMapLayer:{.class} node.
- If we had a lower-level implementation, we could just add the current tile light to the current tile being rendered, but the image-based approach ended up working surprisingly well.
shader_type canvas_item;
render_mode blend_mul;

// --- Uniforms --- //
global uniform sampler2D light_texture: filter_linear;
global uniform sampler2D sky_texture: filter_linear;
global uniform vec2 light_offset;
global uniform float current_time;

uniform sampler2D sky_gradient;

varying vec2 world_position;

uniform sampler2D light_viewport;

// --- Functions --- //
void vertex() {
	world_position = (MODEL_MATRIX * vec4(VERTEX, 0.0, 1.0)).xy;
}

void fragment() {
	vec2 tile_position = world_position / 8.0 - light_offset;
	vec2 local_position = vec2(mod(world_position.x, 8.0), mod(world_position.y, 8.0));

	vec2 tex_size = vec2(textureSize(light_texture, 0));
	vec4 sky_color = texture(sky_gradient, vec2(current_time, 0.0));

	vec4 color = texture(light_texture, tile_position / tex_size) +
		texture(light_viewport, UV) +
		sky_color * texture(sky_texture, tile_position / tex_size).r;

	COLOR *= color;
}
Similar to the liquid renderer, the lighting is attached to the player scene. However, since we want the light to determine the brightness of the scene, we need to set the render_mode to blend_mul instead of the default blend_mix mode. This multiplies the current screen pixels by the rendered light pixel, meaning full white pixels remain the same while colored/black pixel are obscurred.
Conclusion
Overall, given the limitations of working with Godot's built-in systems, we are very happy with how the world looks and feels. It works well enough to have smooth gameplay during normal conditions. While there were likely more custom approaches we could have taken, we are satisfied with what we managed to squeeze out of this system in just 1 semester of development.